Goodman Package Unit: GPG13
Re: Flashing Code 1 / Won't Ignite
Code 1 = 3 Failed Ignition Attempts
► A Manual-Reset Auxiliary Limit and Roll-Out Limit are wired in series with the gas valve and will cause a Fault Code 1.
| Qty |
Possible Causes: |
|
Dirty Flame Sensor |
|
Bad Control Board |
|
Tripped Auxiliary Limit |
|
Tripped Roll-Out Limit |
|
Bad Gas Valve |
| 2 |
Bad Spark Electrode or Spark Wire |
CHECKOUT:
1. Check Ignition Sequence
- If necessary, reset the furnace lockout by cycling high voltage or low voltage power.
- Initiate a call for heat from the thermostat and monitor the ignition sequence.
- The inducer motor should start with no difficulty.
- The pressure switch should close within a couple seconds of the inducer starting.
- The Sparker should begin sparking and the Gas Valve should open.
2. Check Control Board Output
- Re-start the furnace with a call for heat from the thermostat.
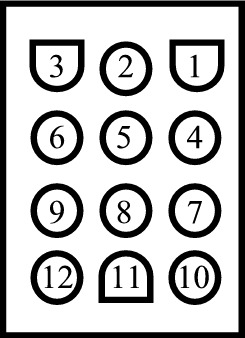
- At the point of ignition, check for 24VAC between Terminal 3 (Purple) of the molex plug on the control board and "Common".
- If the burners are running, wiggle the Purple wire at the molex plug to see if the gas valve drops-out (we've had several issues of a bad connection).
3. Check Gas Valve
- Re-start the furnace with a call for heat from the thermostat.
- At the point of ignition, check for 24VAC between (PUR) and (BL) at the gas valve.
- Power at Gas Valve + No Ignition → Step 4. Check Gas Pressure
- Power at Molex Plug + No Power at Gas Valve ⇒ Check for Tripped Auxiliary Limit or Tripped Roll-Out Limit
- Tripped Auxiliary Limit = Protection against blower failure
- Tripped Roll-Out Limit = Protection against a bad heat exchanger
4. Check Gas Pressure
- Inlet Gas Pressure
- Turn off power to the furnace and check the inlet gas pressure.
- Minimum Pressure = 5" w.c. for Nat. Gas, and 11" w.c. for Propane.
- No or Low Pressure = Bad Meter or Regulator
- Normal Pressure ⇒ Continue
- Re-apply power to the furnace and activate a call for heat.
- Make sure the inlet gas pressure stays above minimum when the gas valve energizes.
- Pressure Drops Below Minimum = Bad Meter/Regulator or Restricted Gas Line
- Normal Pressure ⇒ Check Manifold Gas Pressure
- Manifold Gas Pressure
- Activate a call for heat and monitor the manifold gas pressure during an ignition attempt.
- Normal Pressure = 2.5 - 3.5" w.c. for Nat. Gas, 9 - 11" w.c. for LP
- No Gas Pressure = Bad Gas Valve
- Low Gas Pressure ⇒ Increase Manifold Gas Pressure
- Normal Gas Pressure + No or Delayed Ignition = Clogged Burners ⇒ Remove burners and clean spreaders
5. Check the Sparker / Electrode
- With No Call for Heat, check the spark electrode wire from the control board to the electrode.
- Make sure the wire makes good contact at the control board.
- Look for any rubbed spots that may cause a short.
- Inspect the spark electrode.
- Check for damage.
- Look for any rust particles or other potential shorts.
- Check the Spark Generator:
- Remove the spark cable from the control board and attach a good jumper wire to the spark terminal.
- Turn the gas valve to the "Off" position.
- Activate a call for heat.
- Hold the open end of the jumper wire near a grounded piece of metal (be careful to not get shocked).
- Sparks ⇒ Suspect a Bad Spark Electrode or Spark Wire
- No Spark = Bad Control Board
6. Check Flame Sensor
- DO NOT clean the flame sensor before testing!
- On the multi-meter:
- Switch the test leads to "COM" and "mA".
- Set the meter on DC 200ù.
- Check the reading when the burners ignite.
- Minimum acceptable reading = 1 MicroAmp
- Low Reading ⇒ Clean Flame Sensor & Re-check
- Normal Reading (2 to 6 mA) + Shuts Off ⇒ Suspect a Bad Control Board
- MOVE SENSOR LEADS BACK TO "COM" and "V" BEFORE PROCEEDING!

